Monday, February 28, 2011

Gimiak's SRG log - day 11: Finishing main body

Hi,

I finally finished main body of my Stormraven Gunship. Yes. Next update of my SRG log will be on Saturday, when I will be working on cocpits, weapons and crew. Till then I've to clean all the elements. I've decided to make weapons on small magnets. This will be really helpful in a future. I'll always have an option to choose other guns. So far I've decided to give this flying monster Assault Cannon and Multi melta. For the first tiime ever, this Sunday I've and opportunity to test Blood Angels Stormraven Gunship wih Redav's sneaky Eldar. It work fine. Additionally I've tested Death Company Dreadnought. Also a nice thing. Good that on the beginning of my journej with BA I painted 10 Death Company models. ;)

As for painting, nothing special about this this time. Few elements on the top were painted according to my 'rusty goold' technique.


Regards,
Gimiak

Saturday, February 26, 2011

Gimiak's SRG log - day 10: Further weathering - part two

Hi,

Next step was rusting the silver elements. I've tried this method on my Necron Lord and the end result was very nice. Maybe these pictures will not show you all, but you have to belive me on words that it really look great on the real model.

I've applyied watered Dark Flesh paint with a Citadel Large Brush (great advertisement, buahahaha ;)) using a stipple method on the whole areas. Second coat was watered Vermin Brown using the same method but leaving a lot of previous painted areas. Next-to-last I apply watered down Blazing Orange, still using stipple method. When the last coat dried I've choosen Boltgun Metal paint and Citadel Medium Drybrush. Of course this brush is dedicated for use drybrush method but I used it for stipple method. Yes, next-to-last coat is applied using Stipple method with one exeption. I've taken a little bit paint on the brush and started to make straight strokes on paper, simiilar to drybrush method. The last part is the most important one. When there is a little bit paint (almost dry) on the brush I stipple it on the whole silver areas. yestarday I just didn't have enought time to finish bordering with Mitrhril Silver but I'll do it today.

You can expect tomorrow few pictures of the almost finished Stormraven Gunship body. Yeah!


That's it for now. Expect further progres pictures in a near future.
Regards,

Gimiak

Friday, February 25, 2011

Gimiak's SRG log - day 9: Further weathering - part one

Hello,

It's been some time when I post new information about my Stormraven Gunship project. Unfortunatelly I didn't have time to paint anything and secondly my laptop goes crazy with DVD and monitor, so I was forced to send it to a repairing service. Now I'm working on a, I don't no for sure, 7" screen with an old Asus. Keyboard is dedicated to people with tiny fingers... This will be hard 14 days for me.

As for the log, here is the first part of pictures. I have worked with masking fluid from Winston. IMHO the best medium for this job.


 I do have problems with writing with this small keyboard, so I've prepared more pictures for you. First using a sponge from bliter with metal miniatures I've applied Masking Fluid on all ailerons, elevators and rudder.


When masking fluid dries I've started to stipple Tin Bitz, followed by Shinning Gold, Shinning Gold + Mithril Silver 1:1 mix, and finally Mithril Silver. I recomment to check our tutorials section for more information about 'rusty gold' technique.


Using blue tac (or simmilar medium) I've started to ripping off the masing fluid.


So far, so good. Yesterday I have started to work with 'rusting the engines', I've made couple of shoots, but I'll post them tommorow.

Stay tuned for more.

Ps: I'm really happy about my 4 days furlough. Four nights of painting. I'll try to finish main  body and prepare all other elements for painting.

Wednesday, February 23, 2011

Eldar Jet Bike Squad - at last finished :P

Hi,

Finally I have managed to finish my Jet Bikers and I'm happy with the result.


I painted them as my gaming models but I wanted to make them interesting so I came up with those cracks so you can see them at first glance. I haven’t converted those two drivers because I wanted to have some old ones in this unit and the will stand out a little from the rest and it will be easy to see those weapon specialists.

And here you have a family photo of the whole squad.


Now I'm working on some Eldar Guardians because my army needs to be painted ^_^.

Tuesday, February 22, 2011

yellow-grey marine- some step by step pics

Hi
Some time ago I was asked to make a step by step on how I paint my yellow-grey marines. Below you can see how I made their armour parts. Also took photos from painting face but I'll post them in few days.
sry for the pics, there are a few out of focus...

grey:
the first step was to paint everything with some medium grey (space wolves grey + chaos black) I made some highlights using few layers of lighter mix of SW grey and black, up to pure SW. Then I made some deeper shadows, using more black.
the next step was to make it look more smooth. I used glazes using some previously mixed paints.

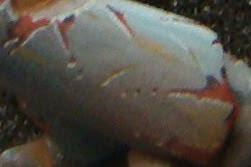
when it was smooth enouch I painted edges of the armour with SW grey+ some skull white

Made some ice blue glazes to make it more interesting, pure grey was boring in my opinion.
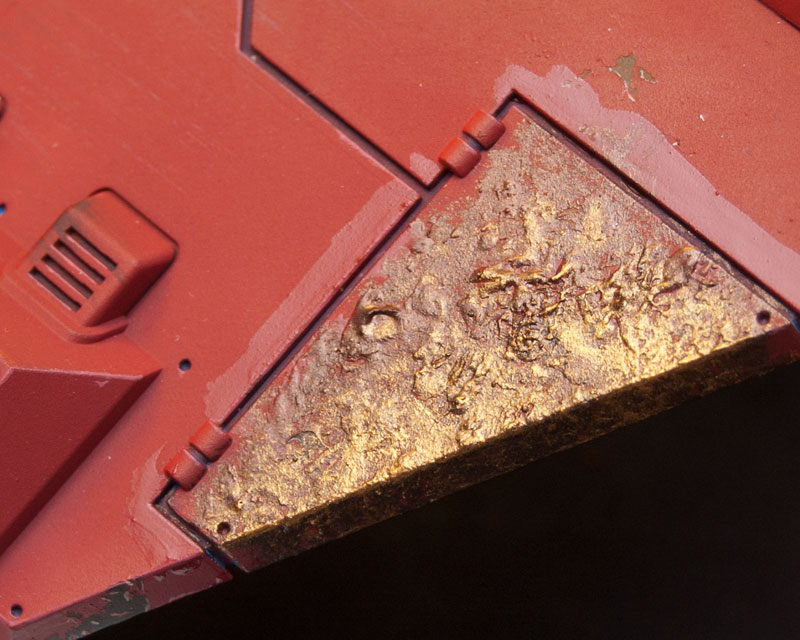
Then I started to paint battle damage. I mixed blood red, chaos black and bestial brown for the base color of scratches.

then, with pure black I painted all the upper edges of battle damage.
and with skull white+some SW grey all the bottom edges. It then looked more 3D and real:)

With watared down snakebite leather I made some dirt and stains.
Then I prepared some dry pastels- light and dark brown and some rusty red.
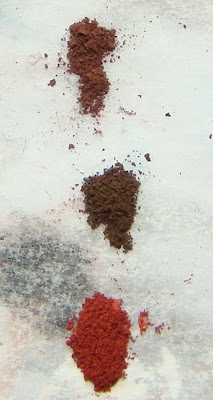
starting with dark brown I put on some pastels with old and big brush (size 3). Then the same with light brown and finally red.

I mixed some snakebite leather and chaos black and painted few lines (those will be shallow scrathes)
and gently highlighted them with some light grey;)
That's all for grey;]
yellow (or beige?:P )
First a basecoat of bleached bone
made some shadows using layers of bleached bone + snakebite leather, up to pure snakebite.

then, with glazing with some mid colors I smoothed it (it's basicly the same as grey but with different colors...)
Higlighted it with skull white and bleached bone mix
Then using the same method as in grey I painted battle damage.
Did some stains using watered down bestial brown
and also same as in grey I put on dry pastels.

and thats all for now:)
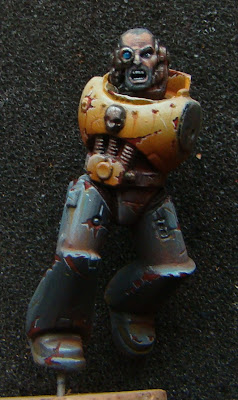
here you can see how this guy looks right now.
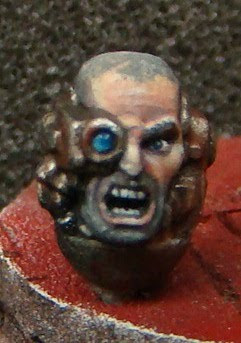
and a close up of face. As I said I'll post another step by step showing how I painted it.
hope you like it!
cheers!
loler